Thursday, December 27, 2012

Snowmen Cake Pop Treats

These snowmen cake pops are the perfect treat for any sweet tooth you may have this winter!  They are easy to make and will dazzle at any holiday party!  Just follow these few steps and see for yourself ;)


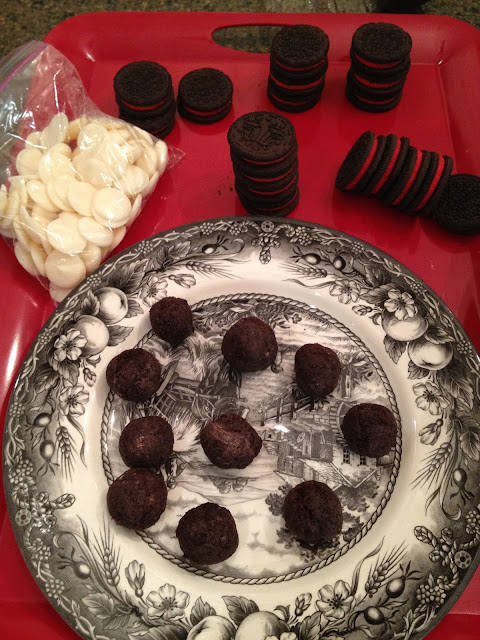
All you need is a box of cake mix, frosting, white chocolate chips, Oreos and some gel frosting to do the faces of the snowmen.  Bake the cake as you would normally.  Mix about 1/4 of a cup of frosting with the baked cake to make the cake part of the cake pops.  You can follow any recipe to make these.  After mixing the cake and frosting together, scoop out little balls of this mix to create the snowman's head.  Set these aside.


(frosting & baked cake mix)


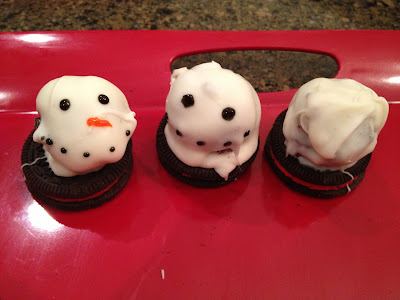
Now, heat the white chocolate chips in the microwave until they melt, but not burn!  Roll the cake and frosting mixed balls in the melted chocolate until covered, then stick to the top of an Oreo.  Let dry, then embellish with black and orange gel frosting for eyes, mouth and nose.


Enjoy these sweet snowmen cake pops!  You can use white cake or chocolate cake and get creative with decorating (scarves, hats, etc.).  I hope you all have a happy new year!

Monday, December 24, 2012

Sassy Sister's House

Every year my large family travels to a different sister's house to celebrate Christmas.  I thought I would share a few photos of our experience this year at my sister Melody's with you.  Her house was decorated beautifully and maybe you could use some of her ideas!  She used a lot of ribbons, whimsical picks, bells, ornaments, silver and feathers in her decor.  Merry Christmas from my family to yours.


Enjoy this Christmas with your family and friends!  Stay sassy ;)


Sunday, December 23, 2012

DIY Christmas Artwork for Kids

Since Christmas is just around the corner, I thought it would be nice to share some fun art ideas with you to do with your kids!


This candy cane is really easy to make! Just paint two fingers red and white and alternate pressing them on the page in the shape of a candy cane.


These little elves were made with two handprints.  Paint the palm and thumbs with a skin color or pink, then paint the fingers green or red, whichever color you want the hat to be.  Press the hand down all at once.  Outline the entire thing, making sure to emphasize the pointy ears!  Add a pom-pom to the top of the hat and create the elf's face with a marker.  You can add goggly eyes if you have them!


This sweet angel was made using both of a child's hands and one foot.  First, paint the bottom of one of their feet white and tell them to step on the paper (landscape so there is room for the wings).  This will be the angel's body.  Next, paint their hands white and place them near their heel print, as shown.  This will be the angel's wings.  Create a face with black marker and embellish with glitter on the wings!


These reindeer were made using footprints.  Paint one foot different colors and have your child step on the paper!  Make a face and antlers with a marker.  Add a nose with a fingerprint of a different paint color!


This Christmas tree was made with a footprint and some fingerprints.  Paint the child's foot green and have them step on the paper.  Paint the star with a paintbrush.  When the tree is dry, draw a string that will connect the lights you're about to add.  Paint two fingers red and yellow and alternate placing them on the string.  

All paint used is acrylic and is not washable.  Enjoy!

Friday, December 21, 2012

Sassy Outdoor Decor

This post explains how I decorated the front of my house!  It is beautiful to look at when lit up at night.  I hope these tips help you and inspire you for future decorating!


To decorate the outside, use lighted garland and be sure to have a spotlight on the front door.  I made a bow for the center of the garland and wrapped some ribbon around the rest of the garland.  I also have candles inside every window that come on along with the lights on a timer around dark every night.


This wreath is made of two different types of ribbon, feathers, pine cones and glittered picks.  You can use almost any natural elements to give any wreath a welcoming feel for your guests. 


These planters on my steps hold flowers in the summer, but for the holidays I made them more festive.  To achieve this look, I layered with a small grapevine wreath, Christmas picks with pinecones (from Hobby Lobby), big pinecones and gold ornaments.


Good luck decorating and Merry Christmas!

Thursday, December 20, 2012

Frosty the Snowman Stops By...

Surprise your kids with a fun visit from Frosty himself this winter!  Here's how!


This exciting visitor is so easy to make come to life for your kids in your bathtub!
You will need:
-2 large buttons for eyes
-1 carrot for nose
-a scarf
-a top hat (ours was a NYE hat from Party City for $2.99)
-quilting batting
-2 sticks from the yard for arms
-loose pillow batting
-styrofoam half moon (hollow on inside)
-toothpicks
-a bathtub
-hot glue & gun
-towels


First, glue some of the loose pillow batting on the convex side of the half moon.  This will be Frosty's head/face.  Be careful, the batting is thin and the glue is hot!
Glue the top hat on Frosty's head.  The cut out part will be against the wall of the tub, so make sure the hat is more in front of the head.
Now, glue the buttons on as Frosty's eyes.
Last for the face, stick a toothpick into a baby carrot.  Insert the carrot into the styrofoam and Frosty's face is all done!


Now for the body.  First, I recommend putting some towels in the the tub as fillers.  Then rip up about half the bag of the loose pillow batting to fill the tub.  Next use the quilting batting to lay over the pillow batting.  Then use the rest of the pillow batting to fill the tub.  


Lay Frosty's head in, wrap the scarf around his neck, add the twigs in the sides and you're all set to show your kids who came to visit!


Frosty can be enjoyed all winter long-- he will never melt ;)

Wednesday, December 19, 2012

Unique Glass Decor for the Holidays

I love to fill glass containers with festive items especially around the holiday season.  This is such an easy way to add a little Christmas sparkle to any part of the room!


Candy canes are great fillers!  They add a festive look and a little color.  Another personal favorite of mine is to use big jingle bells!  I got these brown ones at Hobby Lobby.  I like to place reindeer moss at the bottom of the glass container then fill it with bells, just so there are two different colors in the container.  You can always place these containers on a silver tray and then accent with fresh greenery.


Another way to add a little holiday cheer (emphasis on the "little") is to take small antique glass pieces and fill them with reindeer moss.  I added baby pinecones, small ornaments, and spray painted walnuts.  I bought a bag of walnuts at the grocery store and spray painted them silver.  You can separate these or mix them altogether.  These are cute in a bathroom, end table, etc.  Accent with fresh greenery.


This is where I added my small ornaments and walnuts.  This is on a small table near my back door entryway.  Notice I added fresh greenery as well!


Here is a small centerpiece on a table in my living room.  I have a glass container of large gold ornaments.  I have a chocolate Santa that I bought from eBay.  I also have a piece of framed artwork that one of my children drew years ago around Christmas time.  This is a great way to keep your kid's art and bring it out to enjoy during the holiday!


Here is a better look at the gold ornaments in the glass dome on the coffee table!


I took my nativity scene out of the traditional barn setting and put it on a cake stand!  I put reindeer moss down and then put a glass dome over the whole scene.  I put a tassel on top of the dome.  The stand was placed on a silver tray on top of some stacked books.  I added fresh greenery and a few gold and silver bells around the tray.

I hope you enjoy these decorating tips!  Please comment and tell me how creative you got with your decorating this holiday season :)


Tuesday, December 18, 2012

Chestnuts Roasting On An Open Fire

Chestnuts roasting on an open fire...
Jack Frost nipping at your nose...

I wanted to share with you how I decorated my mantel above my fireplace!


Even though my fireplace is symmetrical, I like to decorate in odd numbers (poinsettias, ornaments).


These stockings are just for looks; the ones we actually use are already stuffed with gifts and tucked away.  These stockings are stuffed with plastic grocery bags to appear full.  I twisted the brown bows around the garland with twist ties to secure them.  I also placed gold and brown ornaments in the garland for some sparkle.  I layered two types of garland together to give dimension and texture.  One is a natural garland with pinecones and pine needles on top of the regular garland that has white lights included.

Special Reindeer Food

Making reindeer food is an easy and fun craft to turn into a tradition for you and your little one!  You can make these bags of food for your kid's friends and keep one for your house!  Put out this special mix on Christmas Eve so Santa's reindeer will be sure to find your house and so they will have a treat to eat while Santa is putting presents under your tree :)


This craft is super easy to make.  You can use almost any ingredients you have in your pantry!  I used Cheerios, sprinkles, dry oatmeal and marshmallows to ensure that everything was edible just in case any of the young children I made this with decided to eat the ingredients.


In years past, I have used glitter, Fruit Loops (any type of cereal works great), and candy!
Make sure you have little baggies to put the mix in.  I happened to have clear gift bags but small Ziploc bags work great as well.


If you're giving a bag away, be sure to add a tag explaining what this special mix is!  I printed one from Thomcat Studios (see below).


Printable tags from the thomkat studios

Be sure to put this bag in a special place so you don't forget to sprinkle it in your yard on Christmas Eve!  Santa's reindeer will surely get into this treat!


Monday, December 17, 2012

Oh, Christmas Tree

I decided to post some of my Christmas tree decorating tips.


This is the tree in the center of our music room.  I used five different types of ribbon on this tree to create dimension.  I have a satin brown ribbon with silver and a mesh copper/bronze ribbon running from top to bottom around the tree.  This elongates the tree.


Extra ribbons can be tied or twisted into bows and added into the tree for extra fullness.


Then I created these "pinwheels," which are made out of three different types of ribbons.  One brown, one burlap, and one copper, each 9-10 inches long.  They are twisted and bound together in the middle with metal craft floral wire.  Cut the ends at an angle and spread these around the tree.  Use them as fillers to hide holes in the tree where you may be lacking ornaments.


This is a non-traditional tree topper.  It is made of ribbon, feather picks, and other whimsical picks. You can use anything festive to create this fullness at the top of the tree, just look around and see what you have!


This tree is just for fun!  It has ornaments that my kids have made and collected over the years.  


This topper was made with a large amount of ribbon, feathers, and whimsical picks.
To make the ribbon appear as a large bow, simply gather large pieces of the ribbon and create loops which you twist onto the branches of the top of the tree.


This tree's unique topper has sticks from crape myrtles I have in my yard.  I spray painted them silver to match the theme of the tree and inserted them into the top along with the ribbon.